Webhooks Example
This example shows how to receive bot messages using webhooks - the recommended approach for real-time message delivery.
This video demonstrates webhooks in action. It first shows the request for creating a bot, then creating a conversation. The user then sends multiple messages and receives multiple bot responses in real-time, without turn-taking or waiting. The right side shows the terminal output with outbound requests (messages sent to the API) and inbound requests (webhooks received from the API). The left side displays the conversation history—equivalent to calling GET /conversations/{id}/messages—showing what your end user would see.
How It Works
Core API Pattern:
- Create a bot and conversation with a webhook URL
- The API sends bot messages to your webhook in real-time
- Your webhook endpoint receives message data as it arrives
- Send user messages via
POST /api/conversations/{id}/messages
Webhook Benefits
Webhooks provide real-time push notifications when bot messages arrive. This is the most efficient pattern and supports advanced features like:
- Artificial delays
- Message retry even if your server is temporarily unavailable
- Message aggregation during delays
- Users being able to interrupt the bot
- Unprompted messages from the bot (automatic follow-ups, re-engagement)
For more details, see the Receiving Messages overview.
Local Development
To receive webhooks locally during development, you need to expose your local server to the internet:
- Install ngrok
- Run
ngrok http 5000to expose port 5000 - Copy the HTTPS URL (e.g.,
https://abc123.ngrok.io) - Use this URL +
/webhookas your webhook endpoint
What is ngrok?
Webhooks require a publicly accessible URL so the Chat API can send messages to your server. During development, your local server (localhost:5000) isn't accessible from the internet.
ngrok solves this by creating a secure tunnel: it gives you a public URL that forwards requests to your local machine. When the Chat API sends a webhook to https://abc123.ngrok.io/webhook, ngrok routes it to localhost:5000/webhook on your computer.
For production, use your actual server's public URL.
Critical: Return 200 Status
Your webhook endpoint must return a 200 status code to confirm receipt. If you don't return 200, the bot's message won't be saved to the conversation history!
Automatic Retries
If we can't reach your webhook endpoint or receive a non-200 status code, we'll automatically retry delivering the message. The API will keep attempting to deliver the webhook until it receives a successful 200 response from your server.
This ensures reliable message delivery even if your server is temporarily unavailable or experiencing issues.
Relevant Data Types
Message:
{
  text: string,
  from_bot: boolean,
  sent_at: number,  // Unix timestamp
  attached_media: {
    url: string, // You can send/receive images by including/reading a url here
  } | null
}
Webhook Payload:
{
  conversation_id: string; //Uuid,
  message: Message;
}
Step 1: Set Up Webhook Server
First, create a simple web server to receive webhooks. This example uses Flask:
import requests
import time
from flask import Flask, request
import threading

API_KEY = "sk_yourapikey"
BASE_URL = "https://api.prioros.com/v3"

# Your public webhook URL (use ngrok URL for local development)
WEBHOOK_URL = "https://your-domain.com/webhook"

headers = {
    "Authorization": f"Bearer {API_KEY}",
    "Content-Type": "application/json"
}

# Create Flask app to receive webhooks
app = Flask(__name__)

conversation_id = None

@app.route('/webhook', methods=['POST'])
def handle_webhook():
    """
    The Chat API calls this endpoint when bot messages arrive.
    """
    data = request.json
    conversation_id = data["conversation_id"]
    print("message received for", conversation_id)

    message = data['message']
    from_bot = message['from_bot'] # Messages received via webhook will always be from the bot, so this is always True

    print(f"🤖 Bot: {message['text']}")
    print("> ", end='', flush=True)

    # CRITICAL: Must return 200!
    return '', 200
The webhook receives a POST request every time a bot message is generated. The payload includes the conversation ID and the message data.
Step 2: Start the Webhook Server
Start your webhook server. This is how you do it in Python & Flask, but will obviously vary depending on your setup:
# Start Flask server in background
def start_webhook_server():
    app.run(port=5000)

webhook_thread = threading.Thread(target=start_webhook_server, daemon=True)
webhook_thread.start()

print("✓ Webhook server running on port 5000\n")
Step 3: Create a Bot
Create a bot with a personality and attributes:
bot_response = requests.post(
    f"{BASE_URL}/api/bots",
    headers=headers,
    json={
        "name": "Anna",
        "freeform": "You're energetic and passionate",
        "attributes": [
            {"name": "bio", "value": "Certified personal trainer specializing in HIIT"},
            {"name": "age", "value": "28"},
            {"name": "location", "value": "Miami, FL"}
        ]
    }
)

bot_id = bot_response.json()['bot']['id']
print(f"✓ Bot created (ID: {bot_id})\n")
Step 4: Create Conversation with Webhook
Create a conversation and specify the webhook URL where bot messages should be delivered:
conversation_response = requests.post(
    f"{BASE_URL}/api/conversations",
    headers=headers,
    json={
        "bot_id": bot_id,
        "user_id": "user_example",
        "create_user_if_not_exists": True,
        "webhook": WEBHOOK_URL  # Bot messages will be POSTed here
    }
)

conversation_id = conversation_response.json()['conversation']['id']
print(f"✓ Conversation created (ID: {conversation_id})")
print(f"✓ Webhook configured: {WEBHOOK_URL}\n")
Step 5: Send Messages
Send user messages to the conversation. Bot responses will automatically be delivered to your webhook:
def send_message(text):
    """Send a user message to the conversation"""
    requests.post(
        f"{BASE_URL}/api/conversations/{conversation_id}/messages",
        headers=headers,
        json={
            "message": {
                "text": text,
                "from_bot": False
            }
        }
    )

# Interactive chat loop
print("=" * 60)
print("Type your messages below. Bot responses arrive via webhook.")
print("Press Ctrl-C to exit")
print("=" * 60 + "\n")

try:
    while True:
        user_input = input("> ").strip()
        if user_input:
            send_message(user_input)
except KeyboardInterrupt:
    print("\n\nExiting...")
    exit(0)
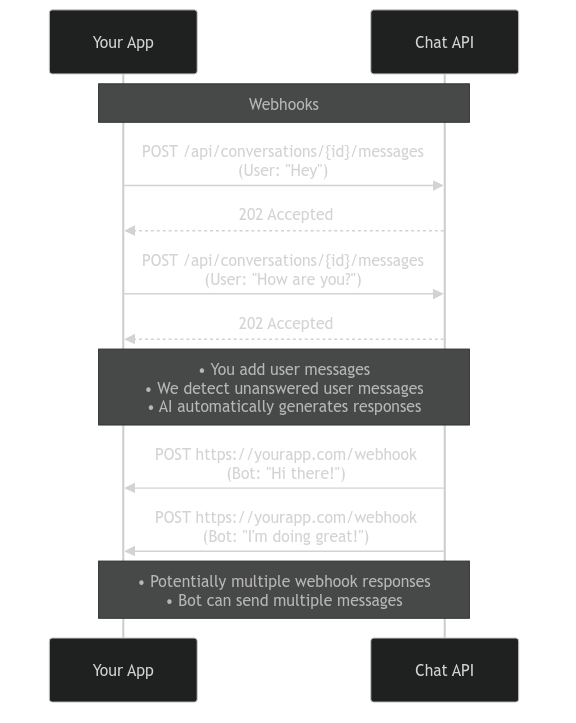
What's Happening Behind the Scenes?
When you send a user message:
- Your code POSTs the message to
/api/conversations/{id}/messages - The API detects unanswered user messages in the conversation history
- The AI automatically generates a response based on the bot's personality
- The bot message is added to the conversation
- The API immediately POSTs the message to your webhook URL
- Your webhook handler processes it and returns 200
The bot can send multiple messages in sequence (message segmentation), and each message triggers a separate webhook call.
Key API Patterns
Creating Resources:
POST /api/bots- Create a bot with personality and attributesPOST /api/conversations- Create a conversation with a webhook URL
Receiving Messages (incoming from the bot):
- Configure
webhookparameter when creating the conversation - The API POSTs to your webhook:
{'conversation_id': '...', 'message': {...}} - Your endpoint must return 200 status
Sending Messages (outgoing from the user):
POST /api/conversations/{id}/messages- Send a message in the conversation- Set
from_bot: falsefor user messages
Next Steps
Receiving Messages OverviewCompare webhooks, polling, and generate-response patterns
Polling ExampleAlternative pattern that doesn't require a public endpoint
Conversation SettingsConfigure delays, segmentation, and more
Production Tips
For production use:
- Use a reliable webhook endpoint with proper error handling
- Configure response delays for more realistic timing (see Conversation Settings)
- Enable message segmentation so bots can send multiple messages in sequence
- Consider using a webhook queue/retry system for reliability
Troubleshooting
Webhooks not arriving?
- Verify your webhook URL is publicly accessible
- Check that your endpoint returns 200 status
- Test your webhook with webhook.site
- For local dev, ensure ngrok is running